Friday, October 16, 2015

Washi Tape Trash Can


Hello again!

I'm back at it with another Washi Tape DIY! Tommy is always throwing his trash on the floor of my car and I get so irritated! I bought a trash bin at Dollar tree and decided to spruce it up a bit!


What you need:
  • Trash Bin (Dollar Tree $1!)
  • Washi Tape (Hobby Lobby)


All you have to do for this is pick out your different Washi Tapes and wrap them around the trash bin! It's super simple and only costs a few dollars to do!


Sorry this is such a short post, but there's not a lot to it! I have to say, you all need to go to your local Dollar Tree! I have always loved Dollar Tree because you can get such great products for only a dollar!

Do you have any more Washi Tape suggestions? Comment or email me!

Follow Me! Pinterest and Tumblr

Shop with me! Avon and Storenvy

Recreations? #countryclassdiy


Thursday, October 8, 2015

Washi Tape Planner Decoration


Hello again!

I still suck at posting, but on the bright side, I have been doing tons of projects, so the drafts are piling up again! My latest obsession is Washi Tape. I know, I know, a little late to the craze, but I've never been one to keep up on the trends.

There are literally hundreds of things you can do with Washi Tape, and if you're a fan of it, I'm sure you have already seen a lot of them. My dilemma when looking for ideas was that THEY ARE ALL THE SAME. So my goal with my Washi tape crafts is to be different!

I saw a lot of ideas for decorating your planner, so I had to try it out! I got my planner at Wal-Mart and it's super plain, just a solid color, nothing fancy about it. I have been absolutely obsessed with the quote, "Don't stop until you're proud" so I decided to incorporate that in my design as well.


What you need:
  • Planner (Wal-Mart)
  • Index Card
  • Sharpie
  • Washi Tape (Hobby Lobby)
  • Scissors


First, write your quote on your index card. This is optional, but I trimmed my card down so it was smaller.


Now just lay your tape over the edges of the card in the pattern you want. Don't worry about the edges being uneven, you can trim them.


Trim the excess off the edges and you're done!


I have had this done for a few weeks and I absolutely love it still! One awesome thing about Washi tape is that it is easy to remove, so if you get tired of this design, you can simply peel it off and do something different!

Let me know what you think!

Recreations? #countryclassdiy
Follow Me: Pinterest and Tumblr
Shop with me! Avon and Storenvy


Tuesday, September 22, 2015

Organizing your T-Shirt Drawer

Hello again!

Today I'm going to show you all how I organize my T-Shirt drawer in order to get the best use of the space!

This is what my drawer looked like before organization:


And this is my drawer after!


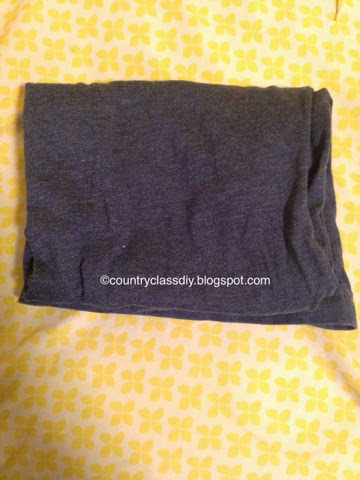
What you first want to do is lay your shirt out flat on your bed or a table.


Next, fold it in half vertically.


Fold the sleeves in.


Fold it in half horizontally.


Fold it horizontally one last time.


Now, place your freshly folded shirt in your drawer!


Here's another view of my finished drawer!


This is an easy and quick way to get some much needed space in your T-Shirt drawer!

Let me know what you do to organize your life!

Send me ideas!

Recreations? #countryclassdiy

Shop with me! Avon and Storenvy

Follow me: Pinterest and Tumblr


Thursday, September 17, 2015

My Avon Holy Grail Products


Hello again!

Sorry, I suck at posting. I swear, whenever I start getting ahead, life throws some wacky thing at me. But, the good news is that I am BACK!

Today I'm just going to share with you some of my Avon Holy Grail products!

Before I get into these products, I will share with you that I have stopped using one of these products (the Clearskin Professionals face scrub) so I will not be talking about that one!

IF you have any Avon products you would like me to try, let me know in the comments or an email!


The first product is the Avon Elements Moisture Boost Daily Moisture Cream Broad Spectrum SPF 15 Oil-Free. This is originally $8.99, but is currently on sale for $4.99. I actually first heard about this product from one of my favorite YouTubers, The Glamour Index, I will link her channel here.

I use this moisturizer in the morning and it has really helped to control the oil in my skin! If you have oily to combination skin, I highly recommend this moisturizer to you. It's affordable and very high quality. Not to mention, it lasts FOREVER! I have had this for a few months and I'm not even a quarter of the way through it.


Next is this Clearskin® Pore Penetrating Black Mineral Mask. This mask is $6.99 originally, which is a great deal! I purchased this mask just to see if it would really work. I am overall pretty impressed with it. I don't use it all too often, but I do use it whenever I'm breaking out really badly and I my skin is super oily. I can't say that this mask works wonders, but it does make my face feel clean and smooth.

If you are looking for a face mask for when your skin feels extra gross, I would highly recommend this product! 


I use this Anew Vitale Gel Cleanser to wash my face this morning. I found that it leaves my skin moisturized and doesn't dry my skin out. This is $10.00, and lasts a long time, I've barely put a dent in it.

If you are looking for a good morning cleanser, I would highly recommend this as it leaves my skin feeling refreshed and smooth.


I use this Clearskin® Professional Daily Correcting Lotion at night after washing my face. It is $17.00 but lasts FOREVER! I did swear by this three-step system, but recently was inspired by The Glamour Index to try out the St. Ives Apricot Scrub, which is why I no longer use the face wash from this line. This is a good moisturizer to use if you have acne-prone skin like myself, but I just want to warn you to be careful with how much salicylic acid you are putting on your face.

I would recommend this product, as long as you use it sparingly, as too much salicylic acid is not good for your face, believe me! 


I recently purchased this Ideal Flawless Pressed Powder in the shade Translucent to set my makeup. It is originally $10 but is currently on sale for $6.99! I actually threw away the little pad that came with it and use a fluffy brush with the powder.

This is a great, inexpensive, product that gives you a great matte finish to any makeup look!


I have been using this Ideal Flawless Cream Concealer in the shade Neutral for quite a while now and I absolutely love it! There are a million ways to apply it and it gives great coverage. It is only $7.00 and lasts an extremely long time. I'm still on my first container!


I just recently picked up this Extra Lasting Eyeshadow Ink in the shade Gold Gleam and instantly loved it! It is a little pricey at $7.00, but it's frequently on sale, and I'm sure it will last a long time. I use this shadow as a base color every day and I actually want to go buy some more colors to accent it! It can be a bit hard to work with at first, but I found that using my fingertip and just patting it on my eyelids works the best!

If you are looking for an AWESOME eyeshadow that has great coverage, I highly recommend this product!


I have had this Mark. Just Pinched blush for a LONG time. So long that Avon no longer carries it. The good news is, I found a product that's just like it and a similar shade for you! The Be Blushed Cheek Color in the shade Tropical Peach is basically the exact same thing, just different packaging! It is originally $8.00 but is currently on sale for $4.99! This is a great deal, because clearly this product lasts FOREVER!

I am actually not a big blush person, but I recently started using this again and It is so easy to apply and blend. All you need to do is apply a line of it where desired and blend with your fingers. How easy is that!

If you aren't sure about blush and want to start out easy, I highly recommend you try this out, because it is a game changer!


This  SuperExtend Precise Liquid Liner is awesome! It is $9.00 but totally worth it! I have never been good at applying eyeliner on my lids, but this product makes it a breeze! The tip is extremely precise, which makes it super easy to get a nice clean line!

If you are new to liquid liner, I would highly recommend this product!


This Glimmersticks Waterproof Eyeliner in Blackest Night is the best eyeliner crayon I have ever used. It is $7.00 and totally worth it. I use this on my waterline and it doesn't run at all and stays nice all day.

If you're looking for a great staple eyeliner, you've found it here!


I also just picked up this SuperExtend Winged Out Mascara in the shade Blackest Black and I already love it! It is $8.00 and I'm sure if you keep watching my website, there will be a sale on it sometime soon! This mascara gives me great length and volume without making my eyelashes stick together. What more could I ask for?


The Extra Lasting Liquid Foundation has been my go-to foundation for quite some time now. I originally bought the shade Shell, but it was a bit too dark for me. So when I ran out, I purchased the shade Light Ivory which is a much better match. This is $12.50 originally but is currently on sale for $9.99!

I love how this foundation gives me great coverage without feeling heavy or sticky on my skin.


Those are all of my current Avon Holy Grail Products, but keep your eye out for more, because I'm always finding something new I want to try!

Recreations? #countryclassdiy

Follow me on: Pinterest and Tumblr

Shop with me! Storenvy and Avon

Tell me what you think in the comments!

New ideas are always appreciated!


Monday, August 24, 2015

Texas Flag - Memorial Nails

Hello again!

This is probably the fastest I've ever posted a bail art tutorial after finishing it, but ingt this needed to be posted right away. I'm posting from my phone again, so sorry for any formatting issues! 

As you see in the title, this is a memorial manicure. On Saturday, my grandparents best friend, Reuben, passed away. This is a hard post for me to write because he was like an uncle to me, but I feel like everyone should know what an amazing, kind-hearted person he was. Reuben always had a smile on his face and always had something to laugh about. He went everywhere with my grandparents and really was a huge part of my family. The last time I saw him was at my grandparents house. I had just pulled in with my sister and this was his first time seeing my new car. He asked whose car it was and when I told him it was mine he smiled and said, "ohhhh! Moving up in the world!" Now every time I get into that car I am able to remember him and that big smile of his.

I truly wish you all would have been able to meet him. He was the most kind and caring person I have ever met. This is a picture of Reuben and my little sister, Breana, just so you can all see that smile of his.


Now, on to the tutorial! 


What you need:
✔️Base Coat (Avon)
✔️White Polish (Avon - French Tip White)
✔️Red Polish (OPI - Red)
✔️Blue Polish (Sinful Colors - Endless Blue)
✔️Top Coat (Pure ICE - Girl on the Run)
✔️Detailing Brushes (EBay)


After your base coat dries, apply your white polish. I ended up needing 2 coats for an opaque look.

After your white polish dries, paint half of your thumb nail blue. I started using one of my detailing brushes but it was actually a lot easier to just use the actual polish brush with very little product on it. 

Next, go horizontally and paint half of the white half red. To do this, I drew my outlines with a detailing brush and then filled it in by using the polish brush.

Once your blue is dry, take a fine tipped striping brush and paint a star in the middle.

Once that dries, apply your top coat and you're done!


Let me know what you think!

To purchase any of the Avon products mentioned visit: youravon.com/dmalloy.

Let me know what you think!

Thursday, August 20, 2015

DIY Sister Canvas

I'm back!

Sorry about sucking at this whole blogging thing lately. I always think I'll have more time during the summer, which is never the case! I go back to school next Tuesday to start my senior year in college! I'm going to try to keep posting once a week, but we all know how I am at keeping promises!

I've been trying a ton of new Avon products and I think I might post some reviews for you all in the near future! Let me know what kinds of things you want to see in the future!

Today I'm going to show you all how to make this super cute sister canvas! I made this almost a year ago for one of my coworkers' baby shower. I wanted to make something for both big sister and little sister and when I saw a canvas like this on Pinterest I thought it was perfect!


This was my inspiration. It's been so long that I have no idea who to credit!


What you need:
  • Assorted paint brushes (I got mine at Wal-Mart a while back)
  • Sponge (Also from Wal-Mart)
  • Canvas (Wal-Mart)
  • Loose Glitter (Wal-Mart)
  • Black Acrylic Paint
  • Light Pink Acrylic Paint
  • Mod Podge


First, paint your entire canvas with your sponge brush. 


Paint the edges with a larger paint brush and wait for them to dry.


Once the canvas is dry, paint your words on! How you paint the words is totally up to your personal preference!


Once your quote has dried, sketch out your princess crown. I just googled 'princess crown' or something like that and found one I liked to copy. 


Take a small paint brush and cover your sketched lines with Mod Podge. Make sure to put a TON on there. And when I say a ton I mean it! If you don't put a lot it will dry out before you get the glitter on.


Once you've covered the whole crown with glue, pour glitter over it. You will want to use something to press down on it. I use the top to my glitter container.

Let it sit for 5-10 minutes then dump the excess glitter off into the trash can or onto some newspaper so you can reuse it!


This is what my crown looked like when I was finished:


Here is the finished product!


Tell me what you think!

Shop with me: Avon and Storenvy

Follow me on: Pinterest and tumblr

Recreations? #countryclassdiy


Wednesday, July 22, 2015

Vintage Rose Accent Nail

Hello Everyone!

I'm back at it! Sorry I haven't posted but this last month has been crazy with 2 online classes! I've painted my nails twice in the past month if that tells you how busy I've been!

Today I'm going to show you one of my all time FAVORITE accent nails! I came up with this vintage themed rose accent nail on a whim and I absolutely love it!


What you need:
✔️Base Coat (Avon ridge finning base coat)
✔️Light pink polish (Ulta no name)
✔️Nude Polish (avon)
✔️Darker pink polish (L.A. Colors)
✔️Green polish (Art Deco)
✔️Gelous (optional)
✔️Too coat (seche vite)
✔️Dotting tool (Avon)
✔️Detailing Brush (Avon)
✔️Single Cevron Vinyls (vinylquickies.storenvy.com)


So before I get into the details I'm going to apologize for the lack of links in this and future posts. I am currently posting from my Blogger app because I don't have internet where I'm staying and the app doesn't give me the option to use links. I will, however, include some websites at the end of the post for you!

First, make sure to apply your base coat to protect your nails!

Next, apply a coat of your darker pink polish and allow that to dry. You may need multiple coats to achieve an opaque color. I believe I used 3 or 4.

Once your base color is dry, put a coat of fast dry top coat on your accent nail. After that dries, apply one of your single chevron vinyls. Paint over that with your nude color and pull the vinyl off IMMEDIATELY! If you wait too long, the polish will become tacky and it gets pretty messy.

After you remove the vinyl and the polish dries, place some dark pink dots on the nude polish. Make sure these are thick dots, as you will be swirling your lighter polish in.

Now add a few small swirls of your lighter polish inside of the dots.

Just add some leaves and top with top coat and Gelous.


I still love these nails and might do a similar design again soon! I have a lot of reviews and tutorials coming, so stay tuned!

Links: 
⭕️Avon: youravon.com/dmalloy
⭕️Pinterest: Pinterest.com/delainalyn
⭕️Recreations: #countryclassdiy