Saturday, December 5, 2015

30 Days of DIY: Wax Melts from Old Candles

Day 13:

So I have decided I wasn't thinking this thing through when I decided to do 30 Days of DIY. I'm literally flying by the seat of my pants right now on what DIYs I'm going to do.

I have to say that I'm pretty proud of this one! Tommy's dad just finished this candle today and I was all over it! I mainly wanted the jar but there was so much wax left that I decided to check Pinterest for a way to make wax melts. Keep reading of you want to see how I did this!


What you need:
✔️A Pot
✔️Old Candle
✔️Some Type of Mold (I used solo cups)


First, fill the cup about a quarter of the way with water. Then place the candle jar in the water and turn the burner on. This is also a really great way to remove the label!

Wait for the candle wax to start melting. Remove the wick before it melts too much (I waited too long and couldn't find mine). 

Once the wax has fully melted, carefully pick the jar up using oven mitts and pour the wax into your molds. 

Now just let them cool! I waited a few minutes and put mine in the fridge to speed up the process.

Once the wax is fully cooled, remove it from your mold. I had to cut my cups because it would not come out no matter what I tried, and I was scared to break it.

Now put it in a jar and you're done!!


These would make an awesome gift for anyone who loves wax burners! I put mine back in the candle jar but will probably find something else to put them in because I want to use the jar for something else.


Let me know what you think!

Recreations? #countryclassdiy


Follow me on: Pinterest and Tumblr

Shop with me! Avon and Storenvy

Friday, December 4, 2015

30 Days of DIY: No-Crease Hair Ties

Day 12:

Hello again!

Today is day 12 of 30 Days of DIY! Before I get into this DIY, I just want to say that I tried that coffee scrub out last night, and it's AWESOME! 

Today I have a super easy and affordable DIY that would be a great stocking stuffer or addition to any gift!


What you need:
✔️Elastic Cord (I got mine at Walmart for like $3)
✔️Scissors
✔️Lighter (optional)


First, cut the elastic cord so it is long enough to fit around your wrist with a few inches extra. 

Then, fold it in half and create a loop and pull the loose ends through it.

Once you've tied it, cut the loose ends diagonally so it looks more polished.

I also burn the edges with a lighter to prevent fraying.


I'm going to make some sugar scrubs for the girls at work and I think I'll attach some of these to the bottle with some bakers twine!

Let me know what you think!

Recreations? #countryclassdiy


Follow me on: Pinterest and Tumblr

Shop with me! Avon and Storenvy


Thursday, December 3, 2015

30 Days of DIY: Glass Q-Tip Holder

Day 11:

Here is the eleventh post in my 30 Days of DIY series!

this is a super simple yet chic way to display your Q-Tips on your bathroom counter! 


What you need:
✔️Old Candle
✔️Q-Tips


This is going to be one of the most simple DIYsI will ever show you! 

All you need to do is clean out your candle jar: throw it in the freezer for an hour and then use a sharp object to remove the wax.


Once you have cleaned your jar out, put your Q-Tips in it! It's as easy as that! This would be cute to add to a spa themed basket (if you have the top to the jar) or just display it on your counter like I did!


Let me know what you think!

Recreations? #countryclassdiy


Follow me on: Pinterest and Tumblr

Shop with me! Avon and Storenvy


30 Days of DIY: Homemade Coffee Scrub

Day 10:

Hello again!

Sorry this is so late, but it's been a rough couple of days.. I stayed up until 1 am on Tuesday studying. Then ended up doing a ton of laundry last night so I didn't have a chance to do any DIY projects. Then this morning, my mom called to tell me her dog, Layton, one of the dogs we bottle fed and raised after her mom died, was hit by a car and killed...its been a rough day to say the least, and it still doesn't seem real to me...

But, let's get on to day 10 of 30 Days of DIY!

This coffee scrub is a great gift to give anyone who loves to pamper themselves! And it's super easy and affordable to make!


What you need:
✔️Candle Jar
✔️Ground Coffee (about 1/2 cup)
✔️Coconut oil (1/4 cup or so)


First, you need to empty your candle jar. Throw it in the freezer for an hour or 2 then use a knife or other sharp object to break the frozen wax and get it out!

If you have nasty residue from the sticker, just use some nail polish remover to get it off!


Mix your coffee grounds and coconut oil in a bowl. It will be easier if your coconut oil is slightly warm. Mine was cool, so it took a bit longer to mix.


Once it is well mixed, it will look like this:


Now all you have to do is put it in your jar!


Add some twine (I got this bakers twine at Dollar Tree) and a label and you're good to go!

How fun is this??

Let me know what you think!

Recreations? #countryclassdiy


Follow me on: Pinterest and Tumblr

Shop with me! Avon and Storenvy

Tuesday, December 1, 2015

30 Days of DIY: Washi Tape Scarf Hangers

Day 9:

Hello again!

I better break it to you all now, but I may have to skip posting tomorrow. I have an exam tonight and afterwards I have a national exam to study for. 

So, I'll try to do a DIY tonight, but be prepared, because it might not happen. But I'll post 2 on Thursday to make up for it!

Today I'm going to show you how to create a super easy scarf organizer!


What you need:
✔️Washi Tape
✔️Shower Curtain Rings (Dollar Tree)
✔️Scissors
✔️A Hanger


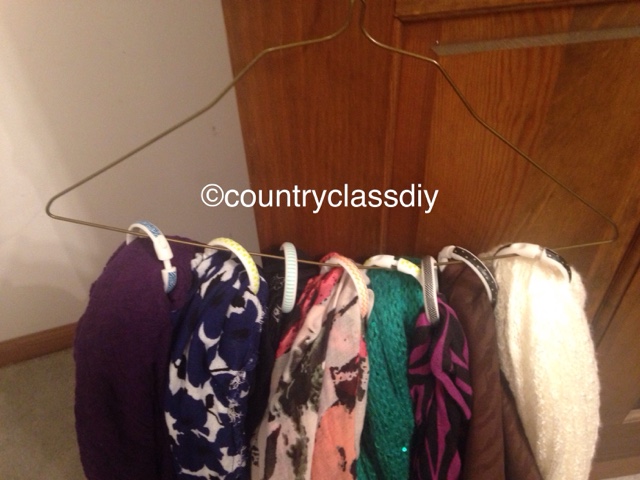
Basically all you do is wrap Washi Tape of your choice around your shower curtain rings. It's that easy! 

I will tell you that the thin Washi tape works better, because you don't have to fold it over the edges.

Also, don't use glitter Washi tape or more stiff and paper like Washi. They don't adhere well to the rings at all. 

Finally, put your rings on a hanger and hang your scarves up and you're done!

This would also be a pretty cool gift to give to someone who loves scarves! But let's be real, I made this for myfelf because I have a scarf problem...


Let me know what you think!

Recreations? #countryclassdiy


Follow me on: Pinterest and Tumblr

Shop with me! Avon and Storenvy

Monday, November 30, 2015

30 Days of DIY: Customized Phone Charger

Day 8:

Hello again!

So I totally was going to whip up some awesome DIYs this weekend, but guess what!

That didn't happen!

So I kind of skimped out on you all today, but tomorrow will be better! I PROMISE!

This isn't really a gift you can give to someone, I mean unless you steal their phone charger and wrap it up, but it is a pretty fun and easy DIY!


What you need:
  • Phone charger
  • Scissors
  • Washi Tape


Literally all you need to do is wrap your charger base with washi tape and cut it so you have a clean edge. Do it until the whole base is covered!

I told you I skimped out...


Let me know what you think!

Recreations? #countryclassdiy


Follow me on: Pinterest and Tumblr

Shop with me! Avon and Storenvy


Sunday, November 29, 2015

30 Days of DIY: Upcycled Soap Dispenser


Day 7:

This DIY might be the most complex of the DIYs I have shown you, but it is super inexpensive and really fun to make.

Last Friday I bought myself a Mocha Coconut Frappucino from Walmart and got the wonderful idea to upcycle the bottle. So I hit Pinterest to look for ideas. There are seriously so many good ideas out there for repurposing these bottles! I decided the first thing I wanted to do was make a soap dispenser.

This would make a great gift because it's super unique and also extremely customizable (like everything I show you)!


What you need:
  • Paint (Apple Barrel - Real Green)
  • Liquid soap with the pump (I got this from Dollar Tree)
  • Empty Starbucks bottle
  • Nail polish (Sinful Colors - All About You)
  • Small Paint Brush
  • Large sponge Brush


The first thing you want to do is wash out your bottle really well and remove the labels. If you have any sticky residue left, or those black date stamps, use acetone or nail polish remover to get rid of it.


Once your glass is clean, cut a hole in the top bug enough for the pump of the soap dispenser to fit through. I had Tommy do this for me because I didn't want to hurt myself.


(Really though, he didn't trust me not to cut myself. He cares.)


Once you've done this you can start painting! I had to do a cream base coat on the lid because the nail polish wasn't opaque. I let Tommy pick the color because I'm indecisive.

Funny story, when I finished painting it Tommy said "you should've painted it blue" I reminded him that he picked the color and he replied "oh, Green is my favorite color, and also my last name." It was hilarious. Sometimes I don't know where he comes up with these things!


Let the paint dry for 10 minutes or so and apply another coat. Do this until it is to your desired opaqueness. I did about 4 coats.


Once it's finished, let it dry over night.

Then insert your soap and your pump and you're done!


I will definitely be doing more of these crafts in the near future, probably sooner rather than later, because I kind of ran out of drafts for 30 Days of DIY already...go me!


Let me know what you think!

Recreations? #countryclassdiy


Follow me on: Pinterest and Tumblr

Shop with me! Avon and Storenvy