Showing posts with label Paint. Show all posts

Wednesday, May 14, 2014

The Failures and the Successes (DIY Mom Canvas)

Hello everyone and happy Hump Day!

I know when I posted my last blog a few days ago I told you that I would soon be posting a tutorial on a nail design with the DIY striping tape...Well, that didn't happen. I attempted to do a cute chevron design on my toes and completely failed...So, I'll keep working on perfecting my use of striping tape, but for now, here is another DIY canvas!

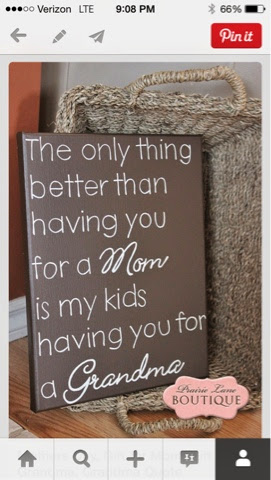
I made this one for my mom, Nancy, to give her mom (my grandma), also Nancy, for Mothers Day and she absolutely loved it! I created this before I created this blog, so I don't have progress pictures, but this is super simple, so hopefully you can all get the hang of it with my completed pictures!!

Tools:
  • Canvas (I used 16x20)
  • Paint brush (Small for details)
  • Large sponge (I got mine from Wal-mart)
  • Paints


Before I start, I just want to give credit to my inspiration for this project. I was browsing pinterest for cute canvas ideas for my grandma and came upon this canvas and my mom and I instantly fell in love! This canvas is no longer available for purchase, but was made by PrairieBoutique on Etsy.


Now, the creation of this simple and sweet canvas!

Step 1: Paint your canvas using your sponge and whatever color paint you chose for the background. I used a beige color. Let the paint dry for a few hours or overnight.

Step 2: Use a ruler or straight edge (I used a piece of paper) to paint the words on in a straight line. I freehanded the words because I felt that it gave the canvas more character, but you can certainly print the letters and transfer them with ink like I did here.

Step 3: If your words aren't showing up too well, simply go over them again.


And ta-da!

I hope you all have a wonderful Wednesday!

Delaina

Find me on Pinterest: pinterest.com/delainalyn
Hashtag recreations to: #countryclassdiy for a chance to be featured on the blog!

Friday, May 9, 2014

Michigan Canvas DIY


I made this canvas at my boyfriend, Tommy's, request (sorry for the poor quality pictures) and am super happy with the results! The above picture is the finished product. Tommy isn't into all of the glitzy stuff, so he just wanted a white background and "John Deere Green" letters. Simple enough! I got my inspiration for a canvas we saw while walking through our local Meijer. Tommy stopped as we were walking and told me he wanted the canvas. One look at the price ($24.99) and I
was shocked. I immediately took a picture (shown below) and told him I could make it. So, I did!


What you need:
  •  Canvas (I bought 16x20 $8 for 2 at Wal-Mart)
  •  Paint (For background and letters 1-2 dollars)
  •  A Printer
  • Scissors
  • Pencils
  • Paint brushes
  • Sponges
Start with a blank canvas. If you want a white background like Tommy did, then you do not have to do the next step. If you want a colored background then use one of your sponges (I got the kinds with the handle at Wal-Mart) and your choice of paint and paint the entire canvas, even the sides. Let it dry for a few hours, or overnight.

Next, get on your computer and go somewhere you can type. I used Microsoft Word. You can choose any font you want for this. I used Arial. You're going to need really big sizes; I didn't use smaller than 72. To get your sizes larger than 72, use the increase size button that is in the fonts area.

You can play around with the font sizes as much as you want. The largest size I used was 120. Print all of the words and cut them out, placing them on your canvas how you want to arrange them.
***Keep in mind that your words will have a little more space when you trace them. You'll see what I mean below***


Once you have all of the words laid out, take them off and tape the phrases together, this just makes it easier to transfer the letters to the canvas. When taping, make sure that you keep the tape off of the backs and fronts of each printed area. Basically, only tape on the white parts.

After you tape the phrases together, turn your first one over and grap a pencil. On the back of the paper, cover the entire phrase with lead from the pencil. It doesn't have to be perfect, just make sure there is lead on the back of each letter.

Next, turn your paper back the correct way and place it how you want it on the canvas. I chose to center all of my words similar to the canvas we saw at Meijer. Once you have the first slip placed how you want it, tape it to the canvas and trace the outline of each of the letters. Do this for every phrase and you will end up with something like this:
***See what I was talking about with the spacing?***


After you have all of your words transferred, grab the paint you want to use for the letters and a small paint brush. I don't have a picture, but mine was for small details. Outline the first letter and then fill it in. Don't worry about being perfect! After filling the first letter in, take one of your sponges and carefully dab at it with the corner, creating a messy look. Do the same thing for the rest of the letters.


This is what mine looked like halfway through:


Then admire your finished product!


Let me know if you have any questions! I'd love to see some of your recreations and twists on this!

Enjoy!

Delaina

Find me on Pinterest: pinterest.com/delainalyn
Hashtag recreations to: #countryclassdiy for a chance to be featured on the blog!