Showing posts with label simple. Show all posts

Friday, July 11, 2014

Brown Sugar Bacon Wrapped Water Chestnuts

Hello everyone! Happy Friday!

I got my wisdom teeth out this morning so I've been laying around on the couch all day and figured I should share this wonderful tutorial with you all!

My boyfriend asked me to make him bacon wrapped water chestnuts for his birthday and they couldn't have been more delicious!

What you need:

  • Bacon
  • Water chestnuts (I used 2 cans)
  • Tooth picks
  • A cookie sheet
  • Brown sugar
  • Oil for the pan


Step 1. Break your brown sugar up and pour it onto a plate or in a bowl.


Step 2. Cut each slice of bacon into thirds.

Step 3. Dip the bacon into the brown sugar and coat both sides.


Step 4. Place a water chestnut in the middle of the bacon.


Step 5. Wrap the bacon around the water chestnut and secure it with a toothpick.


Step 6. Place the finished wrapped water chestnut on an oiled cookie sheet.


Step 7. Bake in the oven at 375 until the bacon is browned. I believe it took mine 20 minutes or so.

Viola!

These are super easy and super irresistible. Let me know what you guys think and if you made any adjustments!

FInd me on Pinterest: pinterest.com/delainalyn
Hashtag recreations to: #countryclassdiy for a chance to be featured on the blog!


Monday, June 9, 2014

How to fix a smudge

Hello Everyone!

I hope you all had a wonderful weekend. Aside from being extremely sick at an outdoor country concert, I had a great time spending time with my boyfriend and his friends!

I've had this tutorial sitting around for a while and I'm finally getting around to sharing it with you all!

When I did my yellow and gold manicure, I was sure my nails were fully dry when I went to bed. Well, I was wrong.

I woke up the next morning to this:

Let's just say I was not a happy camper after spending so much time on my nails the night before.

So, I decided to try and fix my nail...and it worked!

What you need:
  •  A smudged nail
  • Nail polish remover
  • Q-Tip
  • Nail Polish
Step 1. Take your Q-Tip and saturate it in nail polish remover.


Step 2. Take the Q-Tip and rub it along the rough edges of toyr smudge until they are smoothed out.

Below is what my nail looked like after this step.


Step 3. Paint on as many coats as you need to make the polish over the area opaque.


I believe I used 2-3 coats. Below is after I applied all of my coats and my clear top coat:


Let me know what you guys think of this and if it worked for you!

I will gladly take and suggestions for future tutorials!

Find me on Pinterest: pinterest.com/delainalyn


Wednesday, May 14, 2014

The Failures and the Successes (DIY Mom Canvas)

Hello everyone and happy Hump Day!

I know when I posted my last blog a few days ago I told you that I would soon be posting a tutorial on a nail design with the DIY striping tape...Well, that didn't happen. I attempted to do a cute chevron design on my toes and completely failed...So, I'll keep working on perfecting my use of striping tape, but for now, here is another DIY canvas!

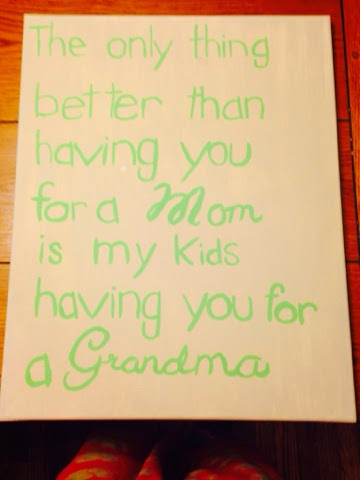
I made this one for my mom, Nancy, to give her mom (my grandma), also Nancy, for Mothers Day and she absolutely loved it! I created this before I created this blog, so I don't have progress pictures, but this is super simple, so hopefully you can all get the hang of it with my completed pictures!!

Tools:
  • Canvas (I used 16x20)
  • Paint brush (Small for details)
  • Large sponge (I got mine from Wal-mart)
  • Paints


Before I start, I just want to give credit to my inspiration for this project. I was browsing pinterest for cute canvas ideas for my grandma and came upon this canvas and my mom and I instantly fell in love! This canvas is no longer available for purchase, but was made by PrairieBoutique on Etsy.


Now, the creation of this simple and sweet canvas!

Step 1: Paint your canvas using your sponge and whatever color paint you chose for the background. I used a beige color. Let the paint dry for a few hours or overnight.

Step 2: Use a ruler or straight edge (I used a piece of paper) to paint the words on in a straight line. I freehanded the words because I felt that it gave the canvas more character, but you can certainly print the letters and transfer them with ink like I did here.

Step 3: If your words aren't showing up too well, simply go over them again.


And ta-da!

I hope you all have a wonderful Wednesday!

Delaina

Find me on Pinterest: pinterest.com/delainalyn
Hashtag recreations to: #countryclassdiy for a chance to be featured on the blog!