Monday, October 27, 2014

Halloween Nails

Hello everyone!

I'm super proud of myself because I actually managed to do some Halloween nails and post them BEFORE Halloween!

This is a fun design that I thought up using some inspiration from different nail designs I've seen lately and putting them together!

Here is the finished look!


What you need:
  •  Base Coat (I use Avon Nail Experts Ridge Filling Base Coat)
  • A slightly tinted neutral color (I used Sally Hansen Beyond Perfect in Sheer White Tea)
  • Purple polish (I used one from Sally's)
  • Green polish (I used a Sally Hansen Insta-Dry)
  • Orange polish (I used an Art Deco detailing polish)
  • Black polish (I used Art Deco)
  • Top coat (I use Seche Vite)
  • Detailing brush and dotting tool (I picked this one up from Avon for 99 cents) 


Step 1. Paint on your base coat and let dry.
 
Step 2. Pain two of your fingers with your tinted/neutral polish. I painted my pointer finger and my ring finger. These will be the fingers you do your dotted "french manicure" on.


Step 3. On your other 3 fingers, take your detailing brush and paint two orange shapes. I tried to make them square, but keep in mind that this doesn't ave to be perfect!


Step 4. Now do the same thing with your green, leaving enough room to make at least one section of your purple.


Step 5. Now fill in the rest of the area with your purple.

Step 6. Now draw lines on all of the borders. (This will cover any lines that weren't straight) 


Step 7. Paint little "stitches" along all of the lines you just painted.


Step 8. Paint some random orange dots concentrated on the top half of your pointer and ring fingers.


Step 9. Do the same thing with your green. Don't be afraid to overlap!


Step 10. And do the same with your purple!

 
Add your favorite top coat and you're done!


I chose not to do a gel manicure simply because I'd prefer not to have Halloween nails a week after Halloween!

Let me know what you guys think!

Recreations? #countryclassdiy
Pinterest
Tumblr
Want to buy Avon?


Tuesday, October 21, 2014

DIY Bobby Pin Holder

Hello again!
 
Sorry once again for my absence! I guess I forgot how busy college can get! Not to mention running an avon business on the side while working part time! But don't worry, I haven't forgotten about you all!
 
Today I have a super easy tutorial for you all! I believe I saw something like this somewhere on Pinterest so I decided to try it out!
 
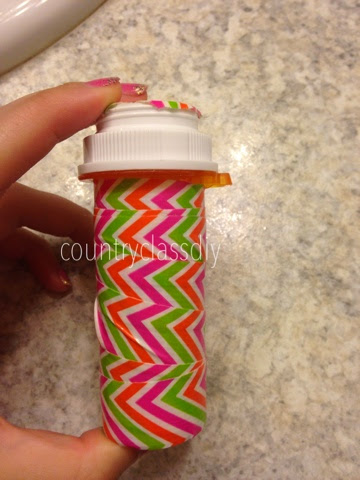
Here is the finished product:
 

What you need:
  • An empty pill container
  • Duck Tape (Any color or style)
  • Scissors


Step 1. Take any sticker off of the pill container.
 
 
Step 2. Wrap your duct tape around the pill container.
 
**If you also want to do the top, just take little strips of tape and cover the top then trim around the edges with scissors***


That is literally it! Tommy decided he was going to wrap the tape for me, so I just sat back and watched! This is super convenient for travel and every day use. I also stick my earrings and necklaces in it when I'm on the go for safe keeping!

I have tons of great posts for you guys in the upcoming weeks and I might even sneak in a fun Halloween nail design if I have time!

Post recreations to #countryclassdiy
Pinterest
To browse the Avon catalog: www.youravon.com/dmalloy
Tumblr


Monday, October 6, 2014

Sunset Gradient Toes

Hello again everyone!
 
Sorry, I'm still terrible about posting, but I'm working on it! You'll be happy to know that this is my oldest draft, so I'm slowly getting caught up!
 
This pedicure is perfect for anyone who is reminiscing about summer as these cold temperatures set in! Plus, I got tons of compliments on them! (Not that you'll be showing your toes anytime soon)
 
Here is the finished look:
 

What you need:
  • Base Coat (I used the ridge filling base coat from avon)
  • White Polish (OPI Alpine Snow)
  • Black polish (A detail bruush is helpful)
  • Yellow Polish (I used one from Sally Hansen)
  • A Coral polish (I used Sally Hansen Kook-A-Mango)
  • Orange Polish (I used Wet 'n Wild Sunny Side Up)
  • A Sponge (I used one from Avon but you could also use a makeup sponge) 
  • Top Coat


Step 1: After painting your base coat, paint one coat of white polish.


Step 2: Next, paint a coat of yellow polish (This is optional)


Step 3: Paint stripes of your colors on your sponge. I actually should've added yellow but I didn't. So don't do what I did!


Step 4: Place the sponge on the middle of your nail and move it from side to side until the entire nail is covered.


Step 5: With your detailing brush, paint a palm tree on your big toe.


Clean up around your nails and voila!


Let me know what you guys think!
 
As you all know, it's breast cancer awareness month, so I'm looking for some manicure suggestions! Comment below or send me an email!


Monday, September 22, 2014

DIY Rice Packs

Hello everyone!
 
Happy Monday once again! Sorry that I've been AWOL, school and my Avon sales seem to be consuming most of my life right now. And on the weekends, I'm typically out fishing with Tommy so I have no internet access!
 
But don't worry, I have plenty of tutorials and DIYs for you!
 
This is a DIY Rice Pack.
 
What is a rice pack exactly? Basically, you can heat it up in the microwave to use as a heating pad or you can stick it in the freezer to use as an ice pack.
 
Ever since I made one for Tommy, I've had tons of requests from family members, so I thought I'd do a tutorial when I made my next ones to share the knowledge!
 
I read somewhere that you can put essential oils or different herbs and spices i here for different effects. I haven't tried that out yet, but I imagine lavender would be great to use for calming purposes!
 
What you need:
  •  A dish towel
  • Thread
  • A needle
  • Scissors
  • Uncooked white rice (enough to fill the pack 1/4 of the way)
This is a picture of the towel I used to make my grandma's. I went out and bought towels, but you could easily use an old dish towel you have laying around!
 

This is about how much rice you need. I'm not the type to use measurements.
 
 
Step 1. Fold your towel in half, inside out.

 
Step 2. Thread your needle and start sewing the bottom.
**You want your stitches pretty close together so no rice falls out.
***Don't worry about having perfect stitches. You'll be turning this inside-out anyway!


Step 3. Once you are close to the end of your thread, make a knot.
 
Here is how I prefer to tie my knots:
 
*Act as if you're making another stitch but leave a portion of your thread up.
 

*Bring your needle back through to the same side as your loop
 
 
*Now, pull your needle through the loop and pull tight.


*Pull your needle under this tightened thread 1 more time just to be safe!
 

*Cut off your extra thread and you're done!
 

Step 4. Now sew up the side of your towel and flip it so it is right-side out.


Step 5. Add your rice.
 
**To tell if you have enough rice, you can lay your rice pack down and hold the top and spread the rice out.If there is a decent amount of rice throughout, you have enough!
 
 
This is about how much rice mine had in it when sitting upright.

 
Step 6. Sew the top and test your stitches over a trash can.
 
Ta-Da!


Let me know if you have any suggestions!

Pinterest
Tumblr
Recreations? #countryclassdiy
Avon


Monday, September 8, 2014

DIY Bow Accent French Tips

Happy Monday Everyone!
 
I'm still extremely behind on my blogging and have tons of drafts sitting out there waiting to be shared with you all!
 
I'll keep pressing on between school and work and eventually I'll get them all caught up!
 
But for now, I'll show you all how to recreate my manicure from 2 weeks ago!
 
This is the same process as my breast cancer manicure which you can find at the link. I'll include all the steps here, just not in as much detail.
 
Here is the finished look:
 

What you need:
  • A neutral base color (I used Sally Hansen Smooth and Perfect in Satin)
  • American Classics Gelous base/top coat
  • A color for your tips (I used Essie Bikini So Teeny)
  • Black Polish (either in a decorating bottle or use a nail art brush)
  • Top coat (I used Seche Vite)

 
After this manicure only lasted 8 days, I decided to try something different. I didn't dot his technique with this manicure, but I'm going to post it with this one so you can all actually enjoy your manicures for longer than a week as well! Coming soon will be my tutorial where my manicure lasted about 11 days!
 
Step 1. Paint a base coat on your nails. I use one that I bought from Avon recently.
 
Step 2. Paint your neutral color and allow to dry.

 
Step 3. Now take your tip color and wipe the brush so there's a small amount of polish on there. Carefully paint the "outline" of your tips.
 
Step 4. Paint a thin coat of Gelous over top.


Step 5. Paint a second line over your tips.


Step 6. Choose your accent finger and paint a black line where your tip ends.


Step 7. Paint 2 triangles that meet on the line.


Step 8. Paint a layer of top coat.
 
Step 9. Paint one last layer of Gelous and let dry.
 
Now, as I said, I didn't follow this method. I used the first method which is mentioned at the beginning of the post. I think what happens when you use gelous as a base coat is that it doesn't stick well to the nail, which seemed to cause my manicure to peel right off my nail. When I used a different base coat, my manicure lasted much longer, as you'll see in my next post!
 
Here is my wear test for this manicure!


Notice the "crack" on my pointer finger? I had to seal this with another
layer of Gelous.


Send me any questions or concerns and I'd love to see recreations and hear your comments!
 
Also, I recently started a Tumblr to help promote this blog! If you'd like to follow me, my URL is: countryclassdiy.tumblr.com
 
Want to buy AVON form me? youravon.com/dmalloy
 
Follow me on Pinterest
 
Recreations? #countryclassdiy