Thursday, December 31, 2015

Simple New Year Nails


Happy New Year's Eve!

Looking back, 2015 has been a rough year for me. We lost 3 of our dogs, our family lost a wonderful friend, and the money struggle has been real. I'm happy to say I've made it through the year, and I'm ready to move on to bigger and better things.

What was your favorite part of 2015? What are you looking forward to in 2016? I'd love to hear from you in the comments!

Today I'm just going to show you my nails for the new year! It's a very simple manicure, so I didn't do my normal step-by-step photos, but I figured you are all smart enough to do this on your own!


Polishes Used:
  • Base: LA Colors Super Strength
  • Glitter: Essie Stroke of Brilliance
  • Main color: Pure Ice Bikini
  • Top Coat: Pure Ice Fast Dry


The main reason I did this manicure was because I received the Pure Ice polish, Bikini, free for review from Influenster. If you're interested in joining Influenster, and possibly getting a box of FREE products to review, follow this link and register through Facebook.

My tips for getting Vox Boxes through Influenster:
  1. BE ACTIVE! Once you get a badge, don't leave it and forget about it. Go on at least once a week and post a review or answer a question in that category. I haven't been great about it, but when I do go on weekly and do this, I've noticed that I typically get a Vox Box!
  2. Connect ALL social media accounts. And I mean all. I am not a Twitter person, but I opened a Twitter solely for the purpose of Influenster. This will help you get badges, as well as to greatly increase your social impact.
  3. Answer your snaps as soon as you get them. Snaps are questions Influenster will ask you, likely to see if you qualify for any upcoming boxes.
  4. If you do get a box, make sure to complete every badge. In my opinion, this will ensure that you get boxes in the future. After all, who wants to send free stuff to someone who isn't going to write reviews or take the time to share their opinion? Certainly not me!
  5. Most importantly, remember that you WILL NOT get every single Vox Box that is sent out. Don't let that discourage you!
Have fun and be safe tonight everyone! I look forward to seeing you all in the New Year!

Let me know what you think!

Recreations? #countryclassdiy


Follow me on: Pinterest and Tumblr

Shop with me! Avon and Storenvy


Wednesday, December 30, 2015

Homemade Stir Fry


Hello, hello, hello!

How are you all doing? I hope your Christmas was great and you spent tons of time with your families! Tommy has been sick, so I've been taking care of him recently, as well as finally folding my laundry and cleaning some things up. I'm really going to try posting more (I'm serious this time guys) and maybe try to get some companies to send me products to review! 2016 is my year of growth! I can already feel it!

Also, I see that there are a lot more people visiting my blog recently. I'd love for you to leave me a comment and tell me how you found me! Or some feedback, or even some ideas! Let's get more interactive!

Today I'm going to share with you one of my favorite go-to recipes: Stir Fry!


What you need:
  • White Rice
  • Meat (I used Venison)
  • 2-3 Bell Peppers (I prefer red, yellow, and orange)
  • Bean Sprouts
  • Water Chestnuts
  • Stir Fry Corn
  • Soy Sauce

First, you want to marinate your meat. Tommy did this for me, so I'm not 100% sure what he used, but I can tell you he at least used Teriyaki and Soy Sauce.


While the meat is marinating, I cut up my peppers into strips and start cooking those. Once they are about half done, I add my meat. It may be better to cook the meat in a separate pan, because I ended up overcooking the meat (whoops).


Once the meat starts to cook up, I add in my water chestnuts, bean sprouts, and corn. I usually let those cook for 5 minutes or so, then add in a spoonful of minced garlic and put some soy sauce over everything.


Turn down the heat and let the soy sauce cook in for a minute or 2.


Put it over some white rice and enjoy! This costs  around $7-8, maybe more if you need to go out and buy meat, and it can easily feed 4 people!


If you try this out, leave a comment below! Did you add something or change something? I'd love to hear about it!


Let me know what you think!

Recreations? #countryclassdiy


Follow me on: Pinterest and Tumblr

Shop with me! Avon and Storenvy


Thursday, December 24, 2015

30 Days of DIY: Gift Basket

Day 30:

Merry Christmas...EVE! Sorry that I didn't post this last night, but I was finishing up my present wrapping and next thing I knew, it was 1:30 in the morning! 

This is an excellent last minute gift idea and is so easy to customize! Plus, it can be really inexpensive!

I made this one for my secret Santa, but I also made one for Tommy's mom as well! They're super fun to make and everything I used cost me $1! How perfect is that??


What you need:
✔️A tub/basket
✔️Tissue paper
✔️Fillers
✔️Basket bag (Party section at Dollar Tree)

What you want to do is crinkle up some tissue paper and place it in the bucket to give it some dimension. Then all you need to do is strange your items how you see fit!


Once you've arranged everything, carefully place it in the basket bag and tie it all up!


You can use some tissue paper to make the bag less see through, just tape 2 pieces together and wrap it around your basket before putting it in the bag. Add some ribbon or twine and a gift tag and you're done!

Let me know what you think!

Recreations? #countryclassdiy


Follow me on: Pinterest and Tumblr

Shop with me! Avon and Storenvy

Tuesday, December 22, 2015

30 Days of DIY: Wrapping Paper

Day 29:

Hello hello helloooooo!

There is only one day left after today and I'm so excited to show you all these last 2 DIYs! 

Today I'm going to show you how to DIY some wrapping paper! Fun, right? 

If you're anything like me, you still aren't done with your wrapping. I'm at about 2 per night, so I should be done by Christmas! 

If you've been following my recent posts, you've probably noticed how obsessed with Dollar Tree I've been. Well, they have cute wrapping paper, but 15 yards will wrap 2, maybe 3, presents. That just doesn't cut it for me. I've seen people posting their DIY wrapping paper, so I figured I would give it a try! And the best part? It cost me $1 ok, $2, because I wanted bows.

That's right! For $1-2, you can wrap tons of presents and customize them however you want!

All you need is brown mailing paper, this is by the school supplies at Dollar Tree, markers, any additions you want. I opted for bows, but you could use ribbon, twine, Washi tape, or whatever you want!

I used my Sharpie oil-based paint markers (the same ones I use for my mugs) to draw this. Do whatever your heart desires! I'll include the two I did last night to give you some ideas.


This one was for Tommy, and I just did a simple 'Merry Christmas' with mistletoe.


This one is for Tommy's little brother, Cody. My original plan was to cover it with deer heads, but let me tell you, that would have taken way too long. So I call this my Christmas mix-match! I thought it was fun!

All you really need to do is have fun with it! I think this wrapping idea is awesome!

I want to see how you wrap your gifts! Send me your photos! Or post them to: #countryclassdiy

Let me know what you think!

Follow me on: Pinterest and Tumblr

Shop with me! Avon and Storenvy


Monday, December 21, 2015

30 Days of DIY: Decorated Snowflakes

Day 28:

We're nearing the end! A feeling of relief is sweeping over me at the moment! You have no clue how hard it is to come up with a DIY a day with a limited budget!

Today I'm going to show you these cute snowflakes we made with our Grandma Judy at our family Christmas!


What you need:
✔️Scrapbook paper
✔️Glitter glue
✔️Any other embellishments 

These were so fun to make! We basically just used our imaginations to make the snowflakes cute! I hung mine on our wall under the cross that Tommy got me and I think they look adorable! The deer one is my favorite! Here's a close-up:


This would be a great craft to do with your kids on Chrostmas Eve and decorate your house with them!

Let me know what you think!

Recreations? #countryclassdiy


Follow me on: Pinterest and Tumblr

Shop with me! Avon and Storenvy

30 Days of DIY: Easy Hot Wings

Day 27:

Hello again! Sorry to keep skipping days, but it's been pretty busy around here! Today I'm going to show you how to make one of Tommy's favorite meals!


These hot wings are super quick to make and easy at that! Perfect for anyone who loves anything spicy!

What you need:
✔️Fully cooked bone-in wings
✔️Oil for frying
✔️Hot sauce

Your first step is to deep fry your wings. I don't time them (let's be real, I don't time anything!) but cook them until they're nice and dark. Not burnt, but a little more than golden.

Once they're done, toss them in your favorite hot sauce and you're finished! How easy is that?


I'm personally not a hot wing girl, but Tommy tells me they're delicious!

Let me know what you think!

Recreations? #countryclassdiy


Follow me on: Pinterest and Tumblr

Shop with me! Avon and Storenvy

Saturday, December 19, 2015

30 Days of DIY: Classic Cheese Ball

Day 26:

The next holiday go-to recipe is my classic Cheese Ball! This recipe is super easy and delicious! I bring it to my step-dads family Christmas every year!

Sorry, I don't have pictures for this one!

What you need:
✔️3-4 packages of cream cheese 
✔️5 or 6 green onions
✔️Deli ham
✔️Shredded Cheese

Your first step is to let the cream cheese soften. Believe me, this will make EVERYTHING a lot easier!

While that is softening, cut your ham up into small pieces. I don't measure this, but I would say about 1/2 of a pack of Sara Lee ham.

You will also want to "slice" your green onions into small slices.

Add your ham and green onion into the cream cheese and mix it up! I usually use a fork to do this.

Once it's all mixed, shape it into a ball with 2 spoons, then roll the outside in shredded cheese!


Surround your cheese ball with different kinds of crackers and you're done! I can guarantee your family will love it!

Let me know what you think!

Recreations? #countryclassdiy


Follow me on: Pinterest and Tumblr

Shop with me! Avon and Storenvy

30 Days of DIY: Cannoli Cups

Day 25:

Hello! 

Sorry that I missed yesterday, but I got stuck in traffic for 2 hours and haven't had a chance to craft. So, that being said, the next few posts will be a few of my favorite recipes for Christmas time!

First, are these amazing cannoli cups! I made these last year when we had our Italian themed family Christmas, and everyone loved them so much that I made them again this year! They're surprisingly simple, and super fast to make!

The linked recipe says it makes 16 cups, but I always double the measurements, and that makes 48 cup with left over filling!

Definitely a great dessert!

Let me know what you think!

Recreations? #countryclassdiy


Follow me on: Pinterest and Tumblr

Shop with me! Avon and Storenvy

Thursday, December 17, 2015

30 Days of DIY: Tea Gift Set

Day 24:

This is a super easy gift that is so customizable and is great for any of the tea lovers in your life! 


Just take a jar, cup, or vase and stuff it with the persons favorite teas! Pair it with a DIY coffee mug or a tea steeper and you have the perfect gift!


I'm going to be doing something like this for my sister for Christmas, so hopefully she doesn't stumble upon this post!

What I like the most about this gift is that you can customize it however you see fit! Add some stickers to the vase, decorate it like you would a sharpie mug, add some decorative stones, the possibilities are endless!

Let me know what you think!

Recreations? #countryclassdiy


Follow me on: Pinterest and Tumblr

Shop with me! Avon and Storenvy


30 Days of DIY: Manicure Gift Set

Day 23:

Hey guys...

I feel ashamed. I have sucked at this 30 days of DIY series...I hope you understand since I've had so much going on lately, but at least I'm still posting 30 DIYs, right?

Enough rambling and on to today's DIY!

This is a gift I put together for our secret Santa at work. So hopefully my person doesn't look at this until after the big reveal! I just won't share the post until then!

This is super easy and everything is from the Dollar Tree! How cool is that??


Just gather up some different manicure items. I thought this little manicure set was super cute! I also got a pumice stone and some blue nail polish, because blue is this persons favorite color!


The red thing that I use to put everything in is actually a candle holder! I thought it was super cute and the person can reuse it in their home!

This whole thing cost me $4 and is a great last minute gift idea!

Let me know what you think!

Recreations? #countryclassdiy


Follow me on: Pinterest and Tumblr

Shop with me! Avon and Storenvy

Monday, December 14, 2015

30 Days of DIY: Sharpie Mug Gift Guide - The Girl

Day 22:

The last Sharpie Mug gift guide is all about the girl in your life! Cover your mug in flowers, polka dots, stripes, or anything she likes, and keep reading for some ideas to fill it!


What kinds of things can you put in a mug for that girly girl in your life?

Manicure: Create a manicure gift set by adding some nail polishes and a manicure set, which can all be found at dollar tree!

Tea Lover: Buy an assortment of teas and fill the cup! Top it off with a cute tea infuser!

Sweet Tooth: Fill the mug with her favorite kinds of candy! What goes better with coffee than candy?

Makeup: Know someone who loves makeup? Buy them different kinds of mascara, eyeshadow, and lip products to fill the cup!

Want to learn how to make a sharpie mug? Check out my original post here!


Let me know what you think!

Recreations? #countryclassdiy


Follow me on: Pinterest and Tumblr

Shop with me! Avon and Storenvy

30 Days of DIY: Sharpie Mug Gift Guide - Unisex

Day 21:

This is the second coffee mug gift guide!

These mugs are super fun and customizable and can be made for anyone! 


Just take some letter stickers (I printed mine on labels and cut them out), stick them on, and use 2 or 3 colors to make dots all around them!

Who can you give them to?

Teacher: Adorn the mug with a cute saying or your teachers name. Fill it with candies and cool desk supplies!

Secret Santa: Put someone's name on it and fill with fun things like a hot cocoa kit or different coffee or tea related things!

Grandma: Fill it with your grandmas favorite tea or coffee and other fun things!

Co-Worker: Add their favorite coffee, some candy, or cute desk supplie to make this gift more personal!

Party Favor: Make some mugs with cute words like "drink," "love," and "laugh" on them to give as holiday party favors! Fill them with candy and other goodies!

Want to know how to make these mugs? See my original post here.

Let me know what you think!

Recreations? #countryclassdiy


Follow me on: Pinterest and Tumblr

Shop with me! Avon and Storenvy

30 Days of DIY: Sharpie Mug Gift Guide - Man

Day 20:

Hello again!

I'm sorry that I've skipped the past few days..its been rough. On the 12, our dog Bo was hit by a car...so needless to say, it hasn't been the best couple of days.

I will be posting 3 DIYs today, but they're all going to be very similar. They will be different coffee mugs, that you can make yourself, and what you can fill them with!

These mugs were made for people to give as presents to their family members, so if you find that you aren't all about making your own mugs, feel free to contact me about ordering one for yourself!


First up will be some ideas for your grandpa (or any man in your life)! I loved this cup and was so happy that she asked me to make this! It is seriously so cute!


What can you put in a coffee cup?

Coffee: this is always a great idea! Especially if your grandpa loves to try different kinds of coffee.

Chocolate: Who doesn't love some chocolate?

Hot Cocoa Mix: You can be as creative with this as you want! Stick some hot cocoa packets in, add some baggies of the person's favorite toppings! Or, make a mason jar hot cocoa craft and give the cup along with it!

Cake Mix: If the guy in your life loves cake, mix up a cake in a cup recipe, and include all the ingredients with your cup!

Mixed Drink: If you're gifting this to someone 21 or over, put some coffee or hot cocoa mix, and attach a mini bottle of alcohol to make that perfect winter drink! I personally love a splash of Rum Chata in my hot chocolate!

If you want to see how to make your own personalized mug, check out my original post here.

I'm sorry again for my slacking, but I hope this helps someone out!

Let me know what you think!

Recreations? #countryclassdiy


Follow me on: Pinterest and Tumblr

Shop with me! Avon and Storenvy


Wednesday, December 9, 2015

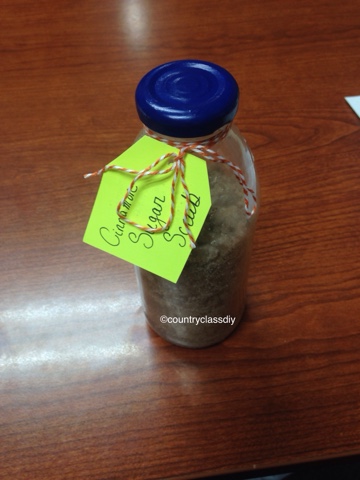
30 Days of DIY: Cinnamon Sugar Scrub

Day 17:

I'm back! 

I felt like death took over my body last night, and I'm not feeling much better today, but thankfully I got ahead in some of my DIYs so that I can just relax tonight!

This sugar scrub is by far my favorite because it smells delicious!


What you need:
✔️Jar
✔️Coconut Oil
✔️Sugar
✔️Cinnamon


The process is the same as the last couple of sugar scrubs I've posted. Mix your sugar in with your oil until it's a sand like consistency (I didn't add enough sugar at first). You will also want to add your cinnamon while mixing, and you need A LOT of cinnamon. Trust me on this one. I used about 1/4 of the container.


Once you've reached the desired consistency, funnel it into your bottle, add some twine and a cute tag and you're done!

I gave this one to my co-worker Sara because it's a Snapple bottle, which has an S on it, which stands for Sara! How creative, right?

I try.


Let me know what you think!

Recreations? #countryclassdiy


Follow me on: Pinterest and Tumblr

Shop with me! Avon and Storenvy


Tuesday, December 8, 2015

30 Days of DIY: Brown Sugar Scrub

Day 16:

The second DIY for today is a twist on the regular sugar scrub!

For this, we add brown sugar to give it a nice scent and color! It reminds me of sand!


What you need:
✔️Bottle
✔️Coconut oil
✔️Granulated Sugar
✔️Brown Sugar


Mix the coconut oil with equal parts granulated and brown sugar. Keep adding sugars until you have a sandy texture.


Once you've reached the desired consistency, funnel the sugar scrub into your jar. Once again, I used a Starbucks Frappucino bottle and painted the lid a springy green color.

Add some twine and a cute tag and you have the perfect gift!


Let me know what you think!

Recreations? #countryclassdiy


Follow me on: Pinterest and Tumblr

Shop with me! Avon and Storenvy

30 Days of DIY: Sugared Coffee Scrub

Day 18:

Sorry I skipped yesterday! It was a crazy day and by the time I got home I was exhausted!

I'll post 2 DIYs today to make up for it though!

This is a spin on the coffee scrub, and I call it a sugared coffe scrub. Creative, right?

I work in insurance, I'm not the best at creativity, okay?


What you need:
✔️Coconut Oil
✔️Coffee Grounds
✔️Granulated Sugar
✔️Bottle


The process is the same as all the other scrubs I've been posting. Combine your sugar and coffee with your coconut oil and mix until it's a sandy consistency!


Once you're done, funnel it into a jar, add twine and a tag, and you're done! These make the best gifts ever!!

Or you could always keep them for yourself!


Let me know what you think!

Recreations? #countryclassdiy


Follow me on: Pinterest and Tumblr

Shop with me! Avon and Storenvy


30 Days of DIY: Sugar Scrub Cubes

Day 19:

We're almost done everyone! It's a good and bad feeling all at the same time! Good because I'm running out of ideas, but bad because I actually had a lot of fun doing this!

I would love any suggestions you might have for more series like this!

I have another sugar scrub idea for you, but this one is simply turning your sugar scrubs into cubes! 


What you need:
✔️Coconut Oil
✔️Coffee Grounds
✔️Granulated Sugar
✔️Cheese Grater
✔️Jar
✔️Bar of soap
✔️Some type of mold (I used muffin holders)


First, grate your soap. Be VERY careful when doing this, because I almost choked on soap dust...it was not pleasant!

I don't have an exact amount to be grated, maybe half the bar? I always just wing it and it works! Then add about 1/4 cup of coconut oil to your soap and melt it in the microwave!

Once melted, add your sugar/coffee grounds as normal and stir! I would use about 1 cup for the whole mixture. I split mine in 2 and did 1 with just sugar then 1 with just coffee grounds.

Once you're done mixing, place your mixture into your molds, making sure to pack down the top.


Put your molds into the freezer for an hour or so to help them harden.

When you pull them out the should come easily out of the mold!


Put them in a pretty candle jar and add some twine and a gift tag!


Just a tip, don't keep these in a warm environment, or they will crumble!

Let me know what you think!

Recreations? #countryclassdiy


Follow me on: Pinterest and Tumblr

Shop with me! Avon and Storenvy


30 Days of DIY: Original Sugar Scrub

Day 15:

Hello!

I skipped last night (I was up late crafting) but I'll be posting 2 DIYs for you today!

Up first is this super easy DIY Sugar Scrub!


What you need:
✔️Granulated White Sugar
✔️Glass bottle
✔️Coconut oil


First, place some sugar in the bowl with your coconut oil. I didn't do exact measurements, just added more sugar until it was a loose and airy consistency.


Once you reach the desired consistency, create a funnel from a piece of paper and pour the mixture in the bottle.

I used an old Starbucks Frappucino bottle and painted the top this pretty blue color.

Add some twine and a tag and you have the perfect gift! I gave mine to my boss and she loved it!


Let me know what you think!

Recreations? #countryclassdiy


Follow me on: Pinterest and Tumblr

Shop with me! Avon and Storenvy

Sunday, December 6, 2015

30 Days of DIY: Watch and Bracelet Holder

Day 14:

Hello again! I'm super excited for today's DIY because it's something I've been wanting to do for a while now!

This is so easy to make and you probably have all of the supplies sitting around your house already! 


What you need:
✔️Paper Towel and Toilet Paper Rolls
✔️Flat Piece of Cardboard
✔️Plastic Bags/Magazine Pages
✔️Washi/Duct Tape
✔️Super Glue/Hot Glue Gun
✔️Scissors


First, you want to stuff your main paper towel roll. I used plastic bags to do this, but you could also use old magazine pages. I would also suggest taping one end before stuffing.

Once you have both ends taped up, start wrapping your Washi/Duct tape around the roll. Do this one strip at a time to avoid creasing.

Once you've finished wrapping your main roll, either use a toilet paper roll or cut a small part off of a paper towel roll to use as the base. 

Cut out 2 half circles to rest the other paper towel roll in. 

Then stuff and wrap the base the same way as the main portion, just don't tape over the end you cut the half circles in.

After you've wrapped the base, glue around the edges and put it in the center of the main portion. Hold it for a few seconds then sit it somewhere to dry.


Next, cut a square piece of cardboard for the bottom, I used the top of my influenster box. 

Now just use some Washi tape to cover it up. I ran out of the tape that I used for the paper towel rolls so I just used some glitter Washi, which I also ran out of.

Once you're done wrapping the bottom, glue it to the base of your stand and hold it for a minute or so.


Let it dry for about an hour then put your bracelets and watched in it!


This would be a great gift or a great thing to make for yourself!!

Let me know what you think!

Recreations? #countryclassdiy


Follow me on: Pinterest and Tumblr

Shop with me! Avon and Storenvy