Monday, November 30, 2015

30 Days of DIY: Customized Phone Charger

Day 8:

Hello again!

So I totally was going to whip up some awesome DIYs this weekend, but guess what!

That didn't happen!

So I kind of skimped out on you all today, but tomorrow will be better! I PROMISE!

This isn't really a gift you can give to someone, I mean unless you steal their phone charger and wrap it up, but it is a pretty fun and easy DIY!


What you need:
  • Phone charger
  • Scissors
  • Washi Tape


Literally all you need to do is wrap your charger base with washi tape and cut it so you have a clean edge. Do it until the whole base is covered!

I told you I skimped out...


Let me know what you think!

Recreations? #countryclassdiy


Follow me on: Pinterest and Tumblr

Shop with me! Avon and Storenvy


Sunday, November 29, 2015

30 Days of DIY: Upcycled Soap Dispenser


Day 7:

This DIY might be the most complex of the DIYs I have shown you, but it is super inexpensive and really fun to make.

Last Friday I bought myself a Mocha Coconut Frappucino from Walmart and got the wonderful idea to upcycle the bottle. So I hit Pinterest to look for ideas. There are seriously so many good ideas out there for repurposing these bottles! I decided the first thing I wanted to do was make a soap dispenser.

This would make a great gift because it's super unique and also extremely customizable (like everything I show you)!


What you need:
  • Paint (Apple Barrel - Real Green)
  • Liquid soap with the pump (I got this from Dollar Tree)
  • Empty Starbucks bottle
  • Nail polish (Sinful Colors - All About You)
  • Small Paint Brush
  • Large sponge Brush


The first thing you want to do is wash out your bottle really well and remove the labels. If you have any sticky residue left, or those black date stamps, use acetone or nail polish remover to get rid of it.


Once your glass is clean, cut a hole in the top bug enough for the pump of the soap dispenser to fit through. I had Tommy do this for me because I didn't want to hurt myself.


(Really though, he didn't trust me not to cut myself. He cares.)


Once you've done this you can start painting! I had to do a cream base coat on the lid because the nail polish wasn't opaque. I let Tommy pick the color because I'm indecisive.

Funny story, when I finished painting it Tommy said "you should've painted it blue" I reminded him that he picked the color and he replied "oh, Green is my favorite color, and also my last name." It was hilarious. Sometimes I don't know where he comes up with these things!


Let the paint dry for 10 minutes or so and apply another coat. Do this until it is to your desired opaqueness. I did about 4 coats.


Once it's finished, let it dry over night.

Then insert your soap and your pump and you're done!


I will definitely be doing more of these crafts in the near future, probably sooner rather than later, because I kind of ran out of drafts for 30 Days of DIY already...go me!


Let me know what you think!

Recreations? #countryclassdiy


Follow me on: Pinterest and Tumblr

Shop with me! Avon and Storenvy


Saturday, November 28, 2015

30 Days of DIY: Washi Tape Magnets

Day 6:

Today I'm going to show you how to make these fun Washi tape magnets! They are super easy and you can do LITERALLY anything with them to personalize them!


What you need:
  • Assorted Washi tape
  • Magnets (Advertisement magnets are perfect)
  • Scissors
  • White mailing labels


If you are using advertisement magnets, you want to cover up the advertisement part with a white mailing label. This just makes it so that nothing shows through the Washi tape.

After you do that, lay down your Washi tape however you want.

Now just cut it however you please and you're done!

These are so simple and fun to make! They would make a great addition to any present!


Let me know what you think!

Recreations? #countryclassdiy


Follow me on: Pinterest and Tumblr

Shop with me! Avon and Storenvy

Friday, November 27, 2015

30 Days of DIY: Washi Tape Phone Case

Hello there!

I really need to come up with a better salutation...Suggestions are greatly appreciated!

Today is Day 5 in my 30 Days of DIY event! I really need your help in coming up with ideas, because after about Day 10, I'm lost. So send me some ideas! Hook a girl up!

Today I'm going to show you how to customize a phone case with Washi tape! This is a great gift idea because it is super easy to customize and you can always change it up!


What you need:
  • Washi Tape
  • Printer Paper (Optional)
  • Pencil (Optional)
  • Scissors
  • Phone case


There are two ways to do this. I already had this clear back phone case on hand so I just improvised and cut out an insert. The easier way would be to buy a clear phone case from Amazon or somewhere and simply wrap the Washi tape over it!

Either way, all you are doing is creating a pattern with your Washi tape and carefully laying it out.

As you may know, I am an avid hunter, and I loved the idea of using this deer Washi tape to create my phone case insert. I added some thin chevron Washi to give it a pop of color!

These are great gifts for anyone and are super easy to make!


Let me know what you think!

Recreations? #countryclassdiy


Follow me on: Pinterest and Tumblr

Shop with me! Avon and Storenvy


Thursday, November 26, 2015

30 Days of DIY: Washi Tape Binder Label

Happy Thanksgiving!

Today is Day 4 of my 30 Days of DIY event! Yes, I decided to call it an event! Today is also my 21st birthday! How exciting!

Today is another easy and quick Washi tape DIY that is super easy to customize!

I made this binder to keep my notes in at work, but you can easily add pictures or quotes to customize it to the person you are giving it to!


What you need:
  • Binder
  • Printer paper/construction paper
  • Permanent marker(s)
  • Washi tape


I may not need to explain this, but I will anyway! Write whatever you feel like on your paper. You could even draw a cute picture if you're artistic! I'm not so I just wrote 'Tidbits of Information' because I'm using this binder to keep my notes from work in.

Then all you need to do is outline your paper with your washi tape and insert it in your binder!

This would be a great gift for a student or someone who needs a little help organizing (like myself). You could even turn it into a scrapbook!


Let me know what you think!

Recreations? #countryclassdiy


Follow me on: Pinterest and Tumblr

Shop with me! Avon and Storenvy


Wednesday, November 25, 2015

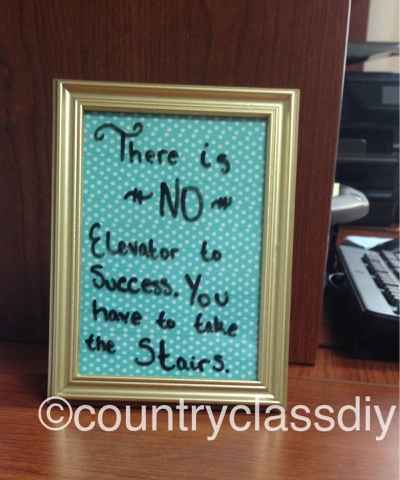
30 Days of DIY: Picture Frame Message Board


I'm Back!

3 days in a row! You guys have to be proud of me! I mean seriously, this is probably the most frequently I've blogged in the year and a half I've been blogging. Go me! Here's to hoping I can keep blogging every day for 30 days! And come up with enough DIYs!

On that note, if you have any suggestions for DIYs, comment them, email me, or send them to me on Pinterest.

For today's DIY, I'm going to show you how to make a DIY message board! This literally coast me one dollar and took 5 minutes to make! It would be a great Christmas gift or an easy room decoration!

I use mine to decorate my desk at work!


What you need:
  • A picture frame (I got mine at Dollar Tree)
  • Washi Tape (Hobby Lobby)


You first want to take the picture out of the frame. Now flip it around! Using the back of the picture, place your washi tape however you would like. I just simply laid it horizontally, but you could easily make a pattern out of it!

Once you have all your washi tap laid down, fold and trim the sides. Put the paper back in the frame and you're done! Write on it with a dry erase marker and you have the perfect cheap and easy Christmas gift!


Let me know what you think!


Recreations? #countryclassdiy


Follow me on: Pinterest and Tumblr

Shop with me! Avon and Storenvy

Tuesday, November 24, 2015

30 Days of DIY: Candle Jar Repurpose


Hello again!

Today is day 2 of my 30 days of DIY 'event' (can I call it an event?)! Today I'm going to show you how to repurpose a candle jar! There are so many things you can do with these candle jars! I absolutely love it!

For the sake of my sanity, I am going to split the candle Jar DIYs up, because come on, 30 DIYs is a lot!

The first one I just used to spruce up my desk. I bought some blue stones at Dollar Tree and filled it up with those! An easy pop of color! You could do a bunch of these to add to someone's holiday décor (or keep them for yourself!).


What you need:
  • An old candle jar (I got this candle from Dollar Tree)
  • Nail polish remover or acetone
  • A knife or other sharp object (optional)
  • Rocks or decorative beads

First you need to stick your candle in the freezer for an hour or 2. This solidifies the wax so it is easier to remove.


Once you take the candle out, you will need something to help you get it out of the jar. I simply used a pocket knife and broke it into chunks.


Once the wax is out of the jar, just wash it out. It's that easy!


The tough part comes when you're removing the label. The best way to get the sticky residue off is to use some acetone or nail polish remover. It seriously comes off like butter!


Isn't this the cutest little jar? It adds the perfect accent to my desk at work!


This is a quick and easy DIY project! The plus is you can personalize it as much as you want!

Let me know what you think!


Recreations? #countryclassdiy


Follow me on: Pinterest and Tumblr

Shop with me! Avon and Storenvy

Monday, November 23, 2015

30 Days of DIY: Washi Tape Binder Clip

Hello again!


With the holidays coming up, I have decided to do 1 DIY idea per day for 30 days! So every day through December 23, I will post a DIY idea! This DIY is a continuation of my Washi Tape ideas series and is super simple! This is a great way to jazz up boring binder clips! It would also be a great gift for anyone who is super organized!


What you need:
  • Washi Tape of your choice (I got mine at Hobby Lobby)
  • Binder Clips


This is extremely simple and customizable to your taste!

All you have to do is carefully place the Washi tape on the binder clip.

Yes, that is ALL you have to do!


If you don't have a lot of money this is the perfect DIY gift! Just buy a whole bunch of binder clips and personalize them!

I put mine on my planner so I can keep track of what month I'm in! Super fun!


Let me know what you think!

Recreations? #countryclassdiy


Follow me on: Pinterest and Tumblr

Shop with me! Avon and Storenvy


Tuesday, November 3, 2015

Bell Pepper Bagel Sandwich

Hello again!

I was doing pretty good there for a while, but we all know I can't keep up a posting streak for long! This semester has gotten crazy busy, but it should be slowing down soon enough!

Today I'm just going to show you a quick lunch idea for those days that you need a fast and semi-healthy lunch!

Watch for more manicure ideas and outfit posts soon, as I plan on painting my nails more and coming up with some cute new outfits!

What you need:
  • Bagel (We used plain)
  • Cream cheese
  • Assorted fresh bell peppers


I think the picture explains itself, but basically all we did was cut the bell peppers up into small pieces, toast a bagel and put cream cheese on both sides, then add the bell peppers on top!

Eat it as a sandwich!

This may sound weird, but it was actually a really awesome combination!

Let me know what you guys think!

Recreations? #countryclassdiy

Follow me on: Pinterest and Tumblr

Shop with me! Avon and Storenvy