Monday, October 27, 2014

Halloween Nails

Hello everyone!

I'm super proud of myself because I actually managed to do some Halloween nails and post them BEFORE Halloween!

This is a fun design that I thought up using some inspiration from different nail designs I've seen lately and putting them together!

Here is the finished look!


What you need:
  •  Base Coat (I use Avon Nail Experts Ridge Filling Base Coat)
  • A slightly tinted neutral color (I used Sally Hansen Beyond Perfect in Sheer White Tea)
  • Purple polish (I used one from Sally's)
  • Green polish (I used a Sally Hansen Insta-Dry)
  • Orange polish (I used an Art Deco detailing polish)
  • Black polish (I used Art Deco)
  • Top coat (I use Seche Vite)
  • Detailing brush and dotting tool (I picked this one up from Avon for 99 cents) 


Step 1. Paint on your base coat and let dry.
 
Step 2. Pain two of your fingers with your tinted/neutral polish. I painted my pointer finger and my ring finger. These will be the fingers you do your dotted "french manicure" on.


Step 3. On your other 3 fingers, take your detailing brush and paint two orange shapes. I tried to make them square, but keep in mind that this doesn't ave to be perfect!


Step 4. Now do the same thing with your green, leaving enough room to make at least one section of your purple.


Step 5. Now fill in the rest of the area with your purple.

Step 6. Now draw lines on all of the borders. (This will cover any lines that weren't straight) 


Step 7. Paint little "stitches" along all of the lines you just painted.


Step 8. Paint some random orange dots concentrated on the top half of your pointer and ring fingers.


Step 9. Do the same thing with your green. Don't be afraid to overlap!


Step 10. And do the same with your purple!

 
Add your favorite top coat and you're done!


I chose not to do a gel manicure simply because I'd prefer not to have Halloween nails a week after Halloween!

Let me know what you guys think!

Recreations? #countryclassdiy
Pinterest
Tumblr
Want to buy Avon?


Tuesday, October 21, 2014

DIY Bobby Pin Holder

Hello again!
 
Sorry once again for my absence! I guess I forgot how busy college can get! Not to mention running an avon business on the side while working part time! But don't worry, I haven't forgotten about you all!
 
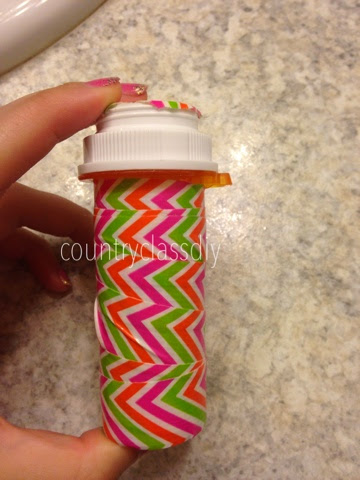
Today I have a super easy tutorial for you all! I believe I saw something like this somewhere on Pinterest so I decided to try it out!
 
Here is the finished product:
 

What you need:
  • An empty pill container
  • Duck Tape (Any color or style)
  • Scissors


Step 1. Take any sticker off of the pill container.
 
 
Step 2. Wrap your duct tape around the pill container.
 
**If you also want to do the top, just take little strips of tape and cover the top then trim around the edges with scissors***


That is literally it! Tommy decided he was going to wrap the tape for me, so I just sat back and watched! This is super convenient for travel and every day use. I also stick my earrings and necklaces in it when I'm on the go for safe keeping!

I have tons of great posts for you guys in the upcoming weeks and I might even sneak in a fun Halloween nail design if I have time!

Post recreations to #countryclassdiy
Pinterest
To browse the Avon catalog: www.youravon.com/dmalloy
Tumblr


Monday, October 6, 2014

Sunset Gradient Toes

Hello again everyone!
 
Sorry, I'm still terrible about posting, but I'm working on it! You'll be happy to know that this is my oldest draft, so I'm slowly getting caught up!
 
This pedicure is perfect for anyone who is reminiscing about summer as these cold temperatures set in! Plus, I got tons of compliments on them! (Not that you'll be showing your toes anytime soon)
 
Here is the finished look:
 

What you need:
  • Base Coat (I used the ridge filling base coat from avon)
  • White Polish (OPI Alpine Snow)
  • Black polish (A detail bruush is helpful)
  • Yellow Polish (I used one from Sally Hansen)
  • A Coral polish (I used Sally Hansen Kook-A-Mango)
  • Orange Polish (I used Wet 'n Wild Sunny Side Up)
  • A Sponge (I used one from Avon but you could also use a makeup sponge) 
  • Top Coat


Step 1: After painting your base coat, paint one coat of white polish.


Step 2: Next, paint a coat of yellow polish (This is optional)


Step 3: Paint stripes of your colors on your sponge. I actually should've added yellow but I didn't. So don't do what I did!


Step 4: Place the sponge on the middle of your nail and move it from side to side until the entire nail is covered.


Step 5: With your detailing brush, paint a palm tree on your big toe.


Clean up around your nails and voila!


Let me know what you guys think!
 
As you all know, it's breast cancer awareness month, so I'm looking for some manicure suggestions! Comment below or send me an email!