Thursday, May 29, 2014

Purple Rose Toe Nails

Hello Everyone!

It seems like it's been forever since I've posted something! Well, I painted my nails again and thought I'd share this cute, easy, and springy design with you!
(Sorry for my sunburnt feet!)


What you need:
 
  • A dotting tool
  • Green nail polish (I used Art Deco)
  • White nail polish (I used Art Deco)
  • Dark pink nail polish (I used Art Deco)
  • Light pink nail polish (I used an Ulta one)
  • Top/Base coat (I used Essie All in One)
  • Purple nail polish (I used Essie Lilacism)


Before I paint my nails, I always take Vaseline and put it around my nails for easy clean up.

Step 1. Put on your clear base coat

Step 2. Paint your base color. I use a white under this particular color because it makes it more vibrant. I used OPI's white
 

 Step 3. Paint on the color your "main" color, in my case, Essie's Lilacism. Use as many coats as you need. I used 2.  

This is just demonstrating how it looks with a second coat:
 
Step 4. On your big toe, use a detailing brush and white polish to make some vertical stripes.
 
Step 5. With the large end of your dotting tool, place some of the dark pink polish in a circle on your toe.
 
Step 6. With the smaller end of the dotting tool, take the light pink polish and swirl it a little.
 
Step 7. Take your green polish and add 2 leaves on each side of the flower.


Let it dry and put your clear top coat on then clean the edges and you're all set!


I am currently sporting this pedicure and got tons of compliments on it at work today!

Try it out and let me know how you guys do!

Also, find me on Pinterest
Hashtag recreations to: #countryclassdiy for a chance to be featured on the blog!


Thursday, May 22, 2014

Rose and Polka Dot Nail Art

Hello everyone!

Since I have more time now, I have been painting my nails more frequently! I finally decided I would try my hand at a rose design and it turned out really well! Below is the completed look:

So, want to know how to complete this look? Keep reading! 

First, the materials. 
  • Base color (I used Maybelline                         Color Show Impeccable Greys)
  • Two accent colors for the dots (I used a pink Art Deco one and Essie "Butler Please")
  • A red polish for the roses (I used a red Art Deco)
  • A pink polish with detail brush
  • A green polish with detail brush
  • Matte top coat
  • A dotting tool (a bobby pin works too)
  • Q-tips
  • Vaseline
  • A stick to clean up with
  • A base coat

Everything I used is pictured below:


This is what I use to clean up. You can easily use an orange stick, paint brush with nail polish remover, or Q-tip with nail polish remover.


Now, let's start!

Step 1. Take a q-tip and dip it in Vaseline, carefully apply the Vaseline around your nails. This makes for a really simple clean up! If you get it on the nail, just wipe it off and keep going.

Step 2. Paint your nails with your clear base coat and wait for them to dry. (I didn't include it in the pictures but I used an Essie one)

Step 3. Once the base coat is dry, paint 2-3 coats of your base color. I used 2. 


Step 4. Next, take your pink polish and your dotting tool and using the smaller dotter, place vertical dots on each nail except for the ring finger. I got between 3 and 5 dots on each nail.


Step 5. Now, take your blue and do the same thing next to the pink dots. Sorry for the horrible picture.


Step 6. Now, use he larger side of the dotter and your red polish and create 2 circles by the base of your nail. They don't ahve to be perfect circles, but they should at least resemble a circle!

Step 7. Now take your pink detailing polish and do a few small swirls within the circle, creating a rose effect.

Step 8. Take your green detailing polish and add 2 leaves to each rose (sorry, you can't really see this in the picture I took)


Step 9. Cover with your matte top coat and let it dry!


I absolutely love this nail art and can't seem to stop admiring it. Hopefully you guys love it too! I would love to see recreations and hear how you like this look!

Have a wonderful day!

Delaina

Find me on Pinterest: pinterest.com/delainalyn
Hashtag recreations to: #countryclassdiy for a chance to be featured on the blog!


Monday, May 19, 2014

Consumer Warning: Old Spice Pure Sport Men's Deodorant

Hello everyone!
 
I know this is not a DIY post, but I thought I should get this out to the public so this doesn't happen to anyone else!
 
About a week ago, I bought my boyfriend, Tommy, a 2-pack of this Old Spice Pure Sport deodorant. He has used Old Spice products before and was pleased, so he figured he would try this kind. Well, on Saturday night (5/17/2014) I noticed that his armpits were all red and blotchy. Upon closer inspection, I also noticed that they were peeling. Look below to see the pictures:


This is gross, I know, but this is a chunk of the skin that came from his armpit.
 
 
Here is a picture of one of his armpits:


And here is his other armpit. Notice the redness:


Here is a closeup of a scab from the burn/ rash he has in his armpit:

 
After seeing this happen, I told him to stop using the deodorant immediately. I also decided I was going to submit a complaint because this should NOT be happening when using deodorant. Now, I try not to be one of those crazy people when I get upset about something because I work in insurance and deal with being yelled at on a daily basis. So, I sent a polite email requesting that something be done to fix this problem. Today, I got an email back from Old Spice apologizing for our bad experience. They then continued to tell me that if the product is used right, nothing should happen. This honestly infuriated me. It's deodorant. He just put it on his armpits and it burned him. Personally, I don't see how he did anything wrong.
 
After telling me that, they told me they sent me 2 replacement coupons. Why exactly do I want coupons for something that just burnt my boyfriend's armpit? So, I replied, requesting that something else be done and I sent them pictures of his burnt and peeling armpits.
 
Nedless to say, we won't be buying this deodorant anymore. I'll keep you updated on what happens. Just beware!
 

Wednesday, May 14, 2014

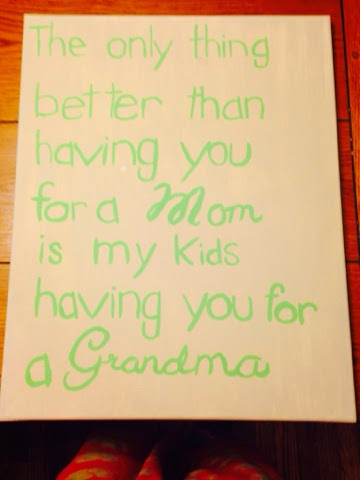
The Failures and the Successes (DIY Mom Canvas)

Hello everyone and happy Hump Day!

I know when I posted my last blog a few days ago I told you that I would soon be posting a tutorial on a nail design with the DIY striping tape...Well, that didn't happen. I attempted to do a cute chevron design on my toes and completely failed...So, I'll keep working on perfecting my use of striping tape, but for now, here is another DIY canvas!

I made this one for my mom, Nancy, to give her mom (my grandma), also Nancy, for Mothers Day and she absolutely loved it! I created this before I created this blog, so I don't have progress pictures, but this is super simple, so hopefully you can all get the hang of it with my completed pictures!!

Tools:
  • Canvas (I used 16x20)
  • Paint brush (Small for details)
  • Large sponge (I got mine from Wal-mart)
  • Paints


Before I start, I just want to give credit to my inspiration for this project. I was browsing pinterest for cute canvas ideas for my grandma and came upon this canvas and my mom and I instantly fell in love! This canvas is no longer available for purchase, but was made by PrairieBoutique on Etsy.


Now, the creation of this simple and sweet canvas!

Step 1: Paint your canvas using your sponge and whatever color paint you chose for the background. I used a beige color. Let the paint dry for a few hours or overnight.

Step 2: Use a ruler or straight edge (I used a piece of paper) to paint the words on in a straight line. I freehanded the words because I felt that it gave the canvas more character, but you can certainly print the letters and transfer them with ink like I did here.

Step 3: If your words aren't showing up too well, simply go over them again.


And ta-da!

I hope you all have a wonderful Wednesday!

Delaina

Find me on Pinterest: pinterest.com/delainalyn
Hashtag recreations to: #countryclassdiy for a chance to be featured on the blog!

Monday, May 12, 2014

DIY Nail Striping Tape


Hello everyone and happy Monday!

I hope you all had a spectacular weekend and spent Sunday pampering your mothers! I know I did! I had promised my mom I'd paint her toenails yesterday but the day got the best of me and I ran out of time! So today I was browing Pinterest for some cute Spring nail art and realized that I really should have some nail striping tape since Scotch tape and I don't have a very good relationship when it comes to nails. Then I realized that I'm broke and I really don't want to wait for something to be shipped to me anyway!

So, I turned to Google. This is when I realized that there really aren;t that many tutorials out there on how to create your own nail striping tape. This led me to create one. And the best part, it cost me $0 to do this!

What you need:
Address labels (any size)
A papercutter (or scissors)
Something to store them in

So, step 1, get your address labels. I used some that were lying around (Avery 1/2"x13/4'). At first, I though drawing some lines would help me to cut (hence the black lines on the side) then I realized that it was sort of pointless and I just free handed it. So, if it's easier for you, draw the guiding lines. Otherwise, you can just wing it!


Step 2, Take your paper cutter, or scissors and begin cutting! Make sure your labels are lined up so you can get as straight a line as possible. You can cut them whaterver sizes you want. I am going to do half of the sheet with smaller ones and the other half with larger.


And this is what you come up with:


This is super easy and much cheaper than buying the nail striping tape from the store! I haven't tried them out yet, but I will surely be posting a tutorial soon on how to use them to create cute, springy designs!

Enjoy your day!

~Delaina

Find me on Pinterest: pinterest.com/delainalyn
Hashtag recreations to: #countryclassdiy for a chance to be featured on the blog!

Friday, May 9, 2014

Michigan Canvas DIY


I made this canvas at my boyfriend, Tommy's, request (sorry for the poor quality pictures) and am super happy with the results! The above picture is the finished product. Tommy isn't into all of the glitzy stuff, so he just wanted a white background and "John Deere Green" letters. Simple enough! I got my inspiration for a canvas we saw while walking through our local Meijer. Tommy stopped as we were walking and told me he wanted the canvas. One look at the price ($24.99) and I
was shocked. I immediately took a picture (shown below) and told him I could make it. So, I did!


What you need:
  •  Canvas (I bought 16x20 $8 for 2 at Wal-Mart)
  •  Paint (For background and letters 1-2 dollars)
  •  A Printer
  • Scissors
  • Pencils
  • Paint brushes
  • Sponges
Start with a blank canvas. If you want a white background like Tommy did, then you do not have to do the next step. If you want a colored background then use one of your sponges (I got the kinds with the handle at Wal-Mart) and your choice of paint and paint the entire canvas, even the sides. Let it dry for a few hours, or overnight.

Next, get on your computer and go somewhere you can type. I used Microsoft Word. You can choose any font you want for this. I used Arial. You're going to need really big sizes; I didn't use smaller than 72. To get your sizes larger than 72, use the increase size button that is in the fonts area.

You can play around with the font sizes as much as you want. The largest size I used was 120. Print all of the words and cut them out, placing them on your canvas how you want to arrange them.
***Keep in mind that your words will have a little more space when you trace them. You'll see what I mean below***


Once you have all of the words laid out, take them off and tape the phrases together, this just makes it easier to transfer the letters to the canvas. When taping, make sure that you keep the tape off of the backs and fronts of each printed area. Basically, only tape on the white parts.

After you tape the phrases together, turn your first one over and grap a pencil. On the back of the paper, cover the entire phrase with lead from the pencil. It doesn't have to be perfect, just make sure there is lead on the back of each letter.

Next, turn your paper back the correct way and place it how you want it on the canvas. I chose to center all of my words similar to the canvas we saw at Meijer. Once you have the first slip placed how you want it, tape it to the canvas and trace the outline of each of the letters. Do this for every phrase and you will end up with something like this:
***See what I was talking about with the spacing?***


After you have all of your words transferred, grab the paint you want to use for the letters and a small paint brush. I don't have a picture, but mine was for small details. Outline the first letter and then fill it in. Don't worry about being perfect! After filling the first letter in, take one of your sponges and carefully dab at it with the corner, creating a messy look. Do the same thing for the rest of the letters.


This is what mine looked like halfway through:


Then admire your finished product!


Let me know if you have any questions! I'd love to see some of your recreations and twists on this!

Enjoy!

Delaina

Find me on Pinterest: pinterest.com/delainalyn
Hashtag recreations to: #countryclassdiy for a chance to be featured on the blog!

The Wit Behind the Name

Maybe you're wondering where I came up with the name for the blog. Maybe not. Either way, I figured I should tell you.

It seems that everything I do, I have to ask my best friend, Christina, first. Well, creating a blog was no different. Christina and I are both overthinkers and are constantly talking to each other about choices we want to make. So, when I asked Christina about creating a blog, she told me to go for it!

Unfortunately,I was not feeling very creative and had absolutely no clue what I would name a blog. I knew what kind of stuff I wanted to post, but I didn't even think of a cute, catchy name! That's when Christina came to the rescue! She's super quirky and creative so she was the perfect person to ask for name suggestions. Shortly after asking her, she replied with the name "Country Class."

I figured I should give Christina some credit for her wonderful idea, and I'm sure this won't be the last time I post about her!

New tutorials will be up this weekend! I hope you all have a wonderful day!

Just the Beginning

Hello everyone!

Before I start blogging my DIY projects and ideas, I thought you should all know a little bit about me first.

To start, I am currently a college student so I'm always looking for new projects that won't kill my budget. Being in college and working part-time, I'm usually pretty busy, so I also look for things that are easy and won't take too much time. Pinterest is one of my few addictions and I tend to get a lot of my ideas from there. But I'm an overthinker so I usually do a ton of research before I finally start working on a project. So, I figured that by starting this blog, I could make a place for my fellow overthinkers to come and find tons of information on one page rather than desperately searching the internet for the tips and tricks they want. Plus, I love helping people, and what's better than making something yourself and saving money by doing it?

I'm slowly figuring this whole blogging thing out, so if anyone has any suggestions, tips, tricks, or hints, please feel free to let me know! I'm always open to advice!

I have some projects that I have already completed and I will work to get them posted for you guys as soon as possible! After all, this is only the beginning!