Showing posts with label purple. Show all posts

Tuesday, November 4, 2014

Chevron and Flower Toes

Hello again!
 
Against all odds, I'm back and posting! My life has pretty much caved in on me these last few days, with my major car troubles to scheduling issues, but I managed to stay afloat!
 
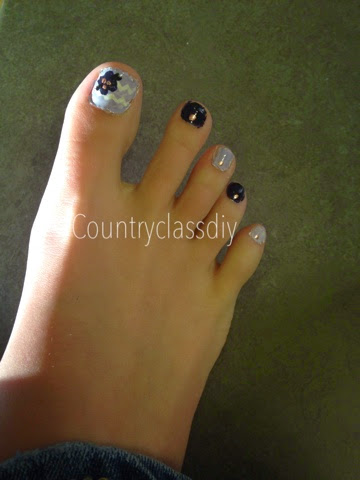
This is a design I did about a month or so ago and I absolutely love it!
 

What you need:
  •  Black Polish (I used one from Art Deco)
  • Base coat (I used Avon's ridge filling base coat)
  • Dark Purple (I used Essie's No More Film)
  • Light Purple (I used Essie's Lilacism)
  • White ( I used OPI Alpine Snow)
  • Top coat (I use Seche Vite)
  • Gold polish (I used one from Ulta)
  • Dotting tool
  • Chevron Vinyls (You can get them here)
  •  


Step 1. Apply your base coat.
 
Step 2. Paint your toes, alternating white and your purple.


Step 3. Paint all of the white toes except your big toe with your light purple.


Step 4. Now, take some vinyls, I used 2, and place them on your had to take away some of the stickiness. After doing this, line them up on your nail.


Step 5. Now paint with your purple over the vinyls and quickly remove them.
 
**Notice that my polish wasn't filly dry so some of it was pulled off. Don't be afraid because you can fix it!


**Take a detailing brush and some white polish to fix any smudges.


Step 6. Take your dotting tool and place 5 dots on your toe (I accidentally made my dots too big so I only got 4)


Step 7. Using your gold, place 3 or 4 small dots in the middle of the flower and one at the base of all of your other toes.


Step 8. Now add 2 small lines on two of the sides of your flower with your black polish.


Now clean around your toes and you're done!


I have to say, I absolutely love the vinyls from Miami Handjobs because they are so affordable and high quality! They also have a wonderful selection of vinyls which I will soon be buying more of. I just have to wait for this whole car trouble thing to pass so I can actually have money again.

If you want to shop her full store, go here.

If you would like to purchase any of the Avon products you see used in the blog, go here

Follow me on Pinterest and Tumblr

Recreations? #countryclassdiy


Monday, October 27, 2014

Halloween Nails

Hello everyone!

I'm super proud of myself because I actually managed to do some Halloween nails and post them BEFORE Halloween!

This is a fun design that I thought up using some inspiration from different nail designs I've seen lately and putting them together!

Here is the finished look!


What you need:
  •  Base Coat (I use Avon Nail Experts Ridge Filling Base Coat)
  • A slightly tinted neutral color (I used Sally Hansen Beyond Perfect in Sheer White Tea)
  • Purple polish (I used one from Sally's)
  • Green polish (I used a Sally Hansen Insta-Dry)
  • Orange polish (I used an Art Deco detailing polish)
  • Black polish (I used Art Deco)
  • Top coat (I use Seche Vite)
  • Detailing brush and dotting tool (I picked this one up from Avon for 99 cents) 


Step 1. Paint on your base coat and let dry.
 
Step 2. Pain two of your fingers with your tinted/neutral polish. I painted my pointer finger and my ring finger. These will be the fingers you do your dotted "french manicure" on.


Step 3. On your other 3 fingers, take your detailing brush and paint two orange shapes. I tried to make them square, but keep in mind that this doesn't ave to be perfect!


Step 4. Now do the same thing with your green, leaving enough room to make at least one section of your purple.


Step 5. Now fill in the rest of the area with your purple.

Step 6. Now draw lines on all of the borders. (This will cover any lines that weren't straight) 


Step 7. Paint little "stitches" along all of the lines you just painted.


Step 8. Paint some random orange dots concentrated on the top half of your pointer and ring fingers.


Step 9. Do the same thing with your green. Don't be afraid to overlap!


Step 10. And do the same with your purple!

 
Add your favorite top coat and you're done!


I chose not to do a gel manicure simply because I'd prefer not to have Halloween nails a week after Halloween!

Let me know what you guys think!

Recreations? #countryclassdiy
Pinterest
Tumblr
Want to buy Avon?


Thursday, May 29, 2014

Purple Rose Toe Nails

Hello Everyone!

It seems like it's been forever since I've posted something! Well, I painted my nails again and thought I'd share this cute, easy, and springy design with you!
(Sorry for my sunburnt feet!)


What you need:
 
  • A dotting tool
  • Green nail polish (I used Art Deco)
  • White nail polish (I used Art Deco)
  • Dark pink nail polish (I used Art Deco)
  • Light pink nail polish (I used an Ulta one)
  • Top/Base coat (I used Essie All in One)
  • Purple nail polish (I used Essie Lilacism)


Before I paint my nails, I always take Vaseline and put it around my nails for easy clean up.

Step 1. Put on your clear base coat

Step 2. Paint your base color. I use a white under this particular color because it makes it more vibrant. I used OPI's white
 

 Step 3. Paint on the color your "main" color, in my case, Essie's Lilacism. Use as many coats as you need. I used 2.  

This is just demonstrating how it looks with a second coat:
 
Step 4. On your big toe, use a detailing brush and white polish to make some vertical stripes.
 
Step 5. With the large end of your dotting tool, place some of the dark pink polish in a circle on your toe.
 
Step 6. With the smaller end of the dotting tool, take the light pink polish and swirl it a little.
 
Step 7. Take your green polish and add 2 leaves on each side of the flower.


Let it dry and put your clear top coat on then clean the edges and you're all set!


I am currently sporting this pedicure and got tons of compliments on it at work today!

Try it out and let me know how you guys do!

Also, find me on Pinterest
Hashtag recreations to: #countryclassdiy for a chance to be featured on the blog!